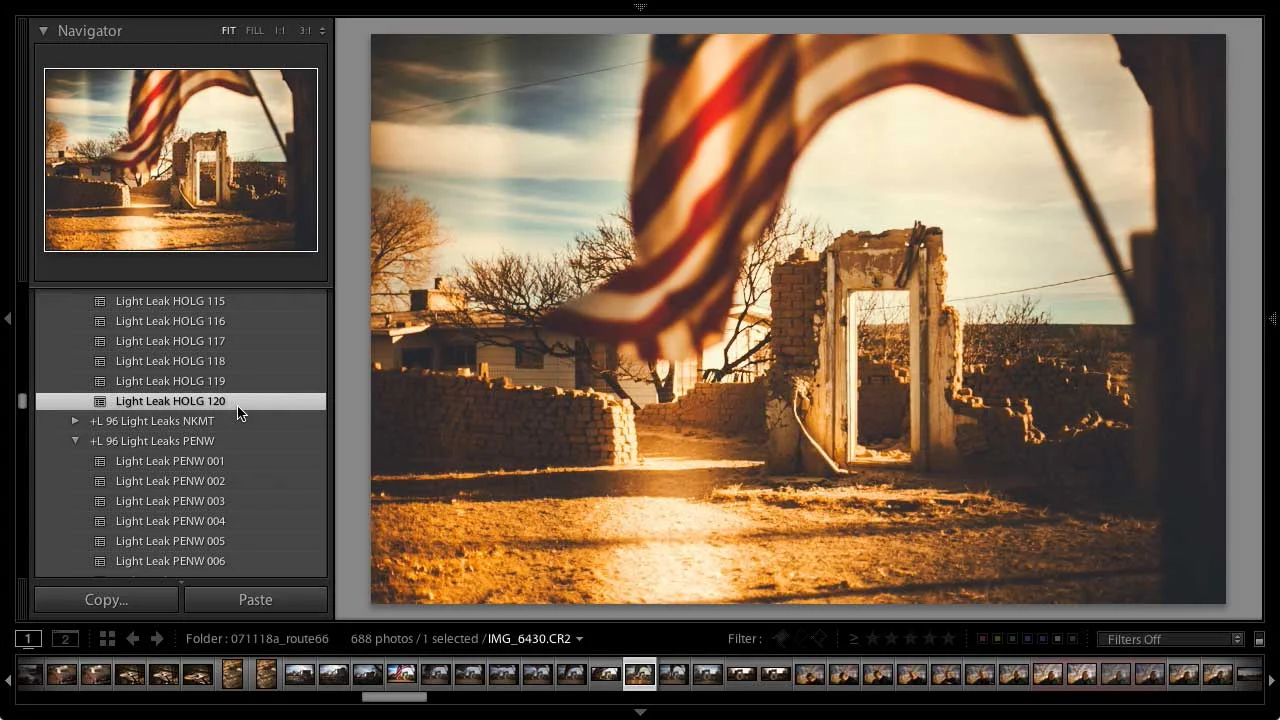
Installing Prolost Presets for Lightroom 6 or Earlier

To begin, make sure to download the latest version of the Prolost Presets you wish to install. Verify that the version of Lightroom you have is supported by the presets.

This installation process involves copying folders of presets into a specific folder on your system drive. We’ll start by locating the folder we're copying to.

  • Launch Lightroom.
  • Open Preferences (on Mac that’s Lightroom → Preferences, on Windows it's Edit → Preferences).
  • Click on the Presets tab.
  • Click Show Lightroom Presets Folder...
  • Within the folder that opens, double-click the Develop Presets folder. This is the folder that you'll copy the preset folders into.
  • In the folder you unzipped, open the For Lightroom 6 folder. There, select all the folders that start with +L, and drag them into the Develop Presets folder.
  • You should now have multiple folders beginning with “+L” in your Develop Presets folder.
  • Return to Lightroom and quit the app.
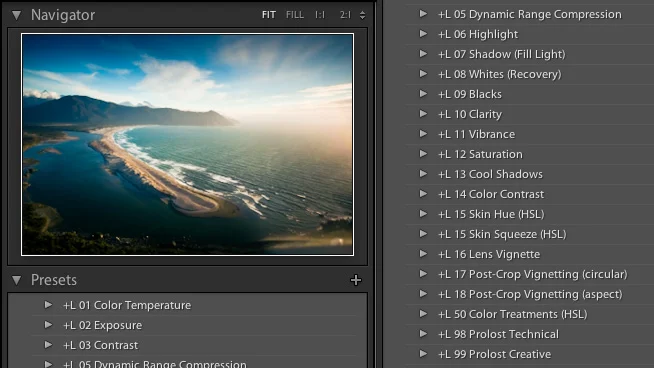
  • Now launch Lightroom and go to the Develop module. You should see the Preset Groups in the left panel beginning with the +L prefix.

More FAQs

Installing Prolost Presets for Lightroom

 
importPresetsCC_crop.jpg
 

Remember, Presets are different from Profiles! Looking for how to install Profiles? Go here.

  • Update Lightroom to the latest version. Looking for Lightroom Classic? Go here.
  • Make sure you download the latest version of the Prolost Presets you wish to install.
  • Decompress the zip file you downloaded from the Prolost Store in a convenient place, such as your Downloads folder.
  • In Lightroom, press E to reveal the Edit controls.
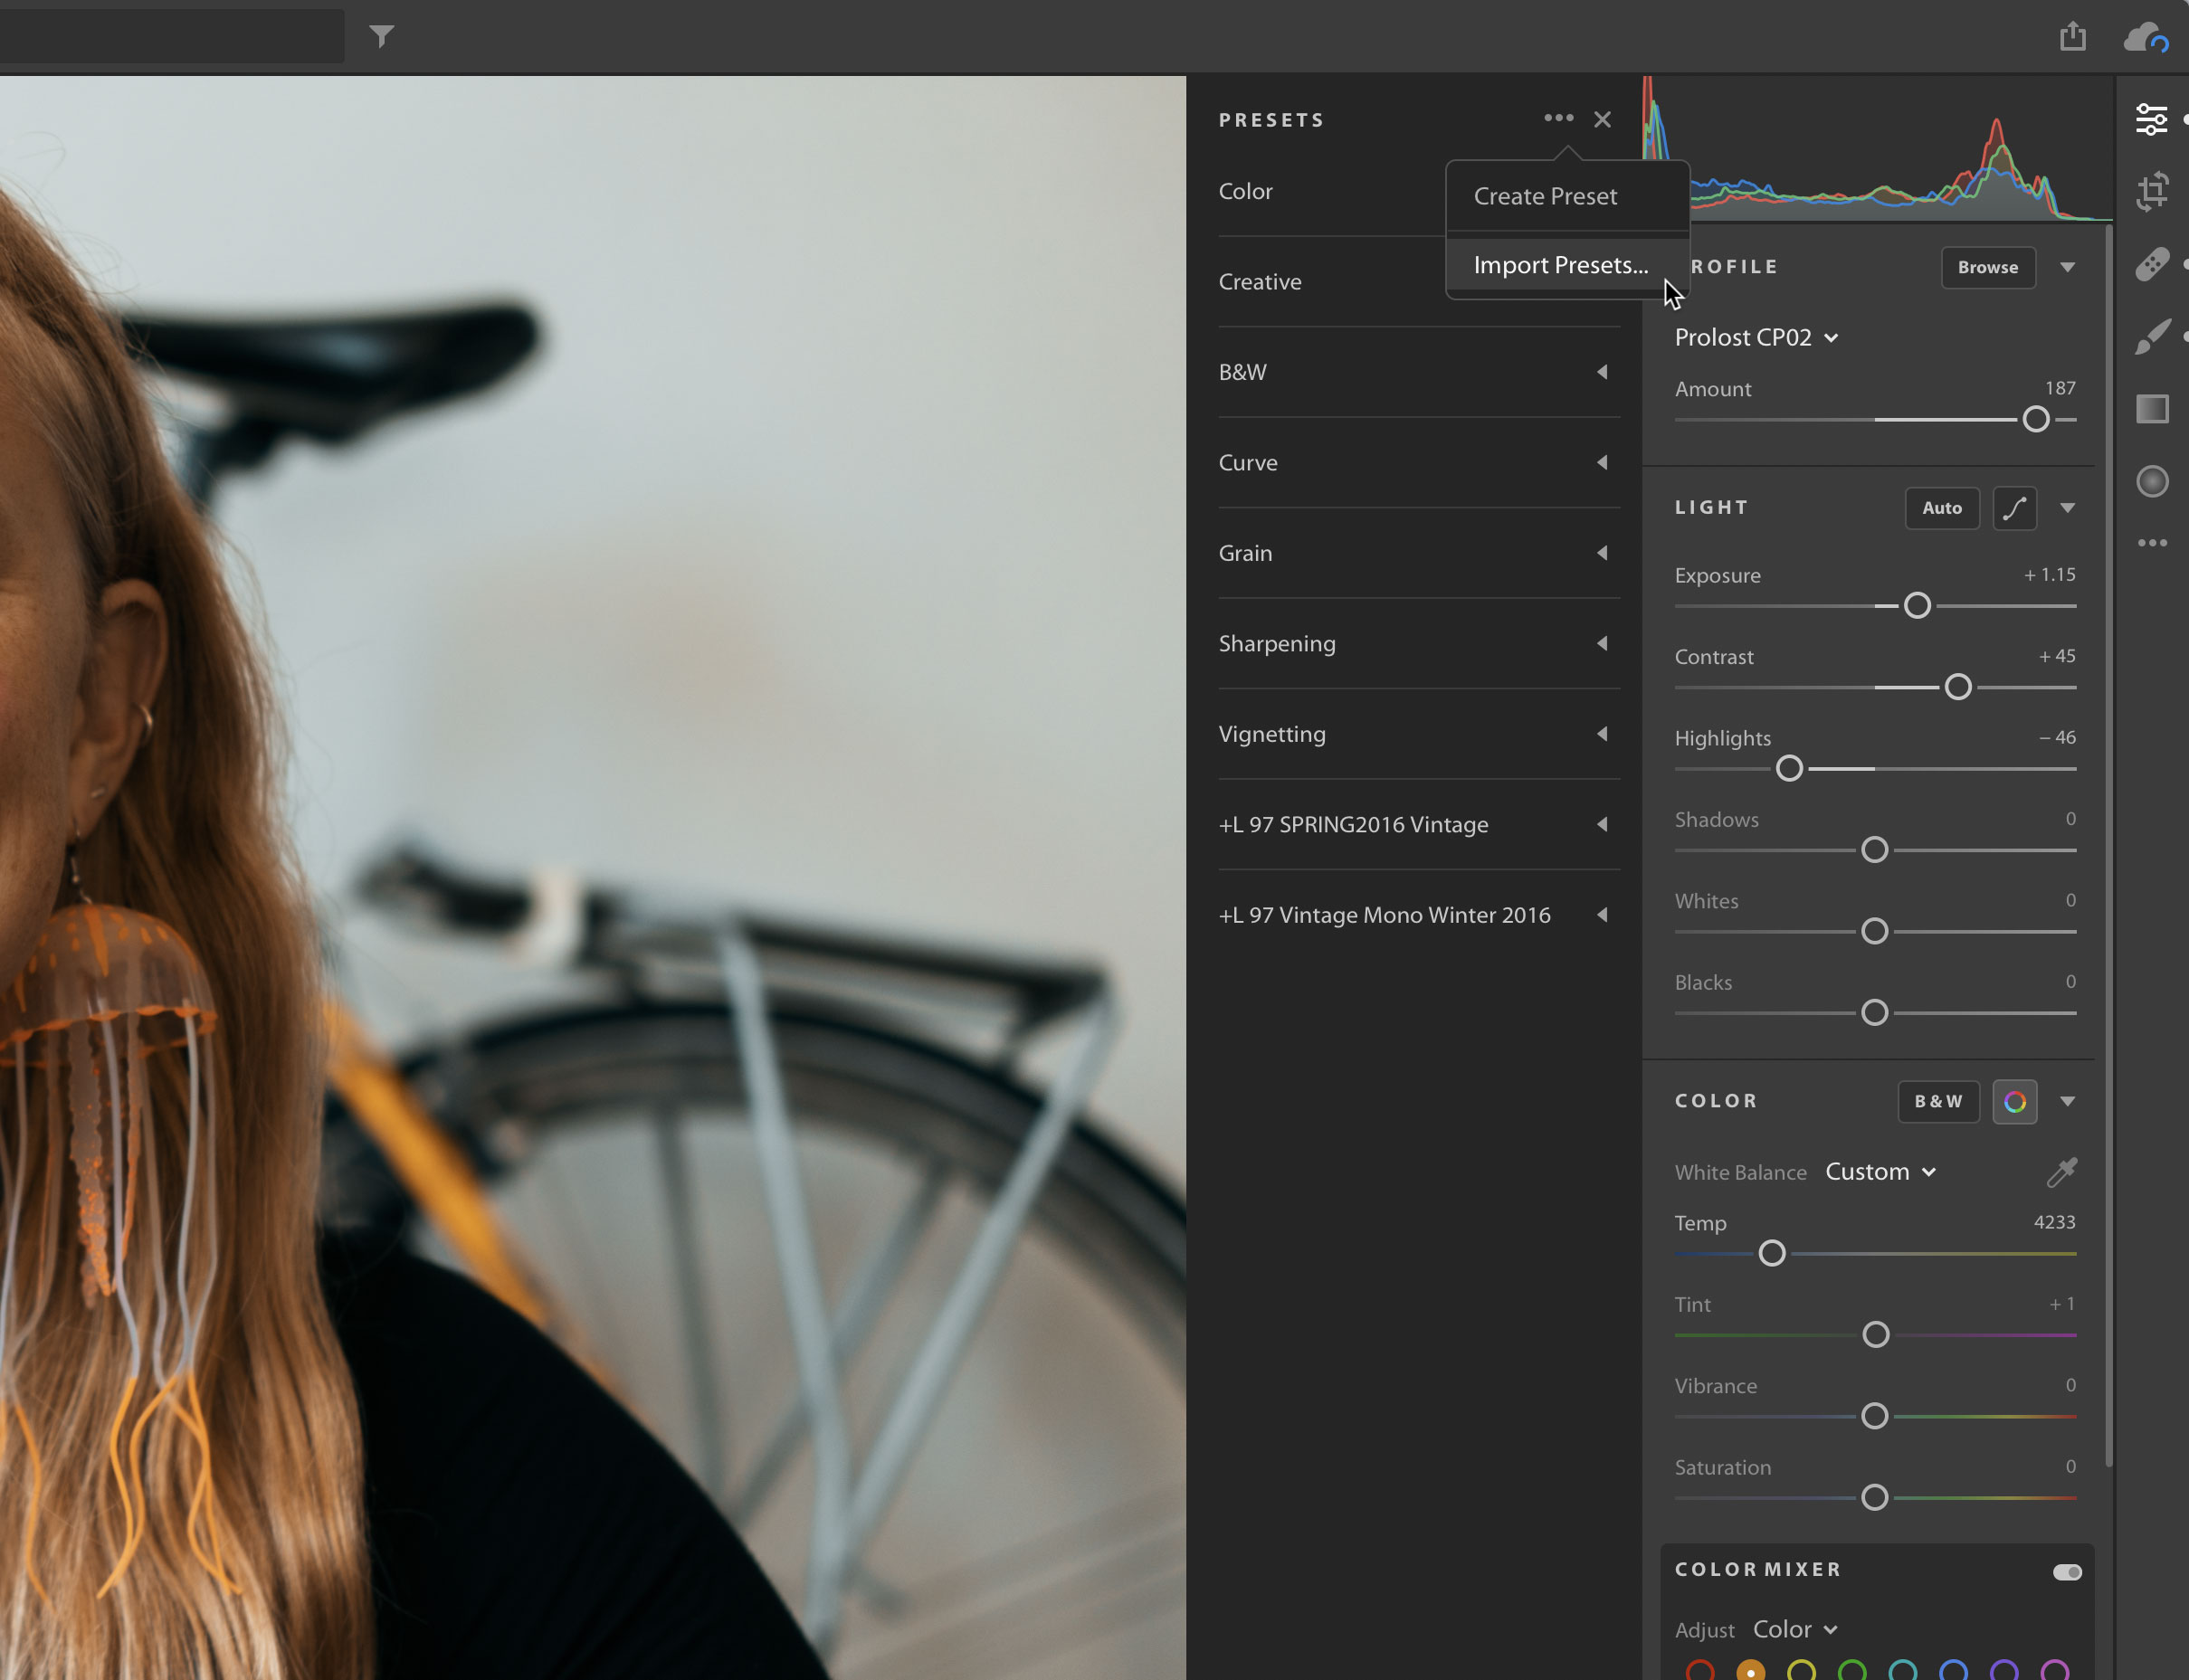
  • Click on the Presets button at the bottom right to expose the Presets list.
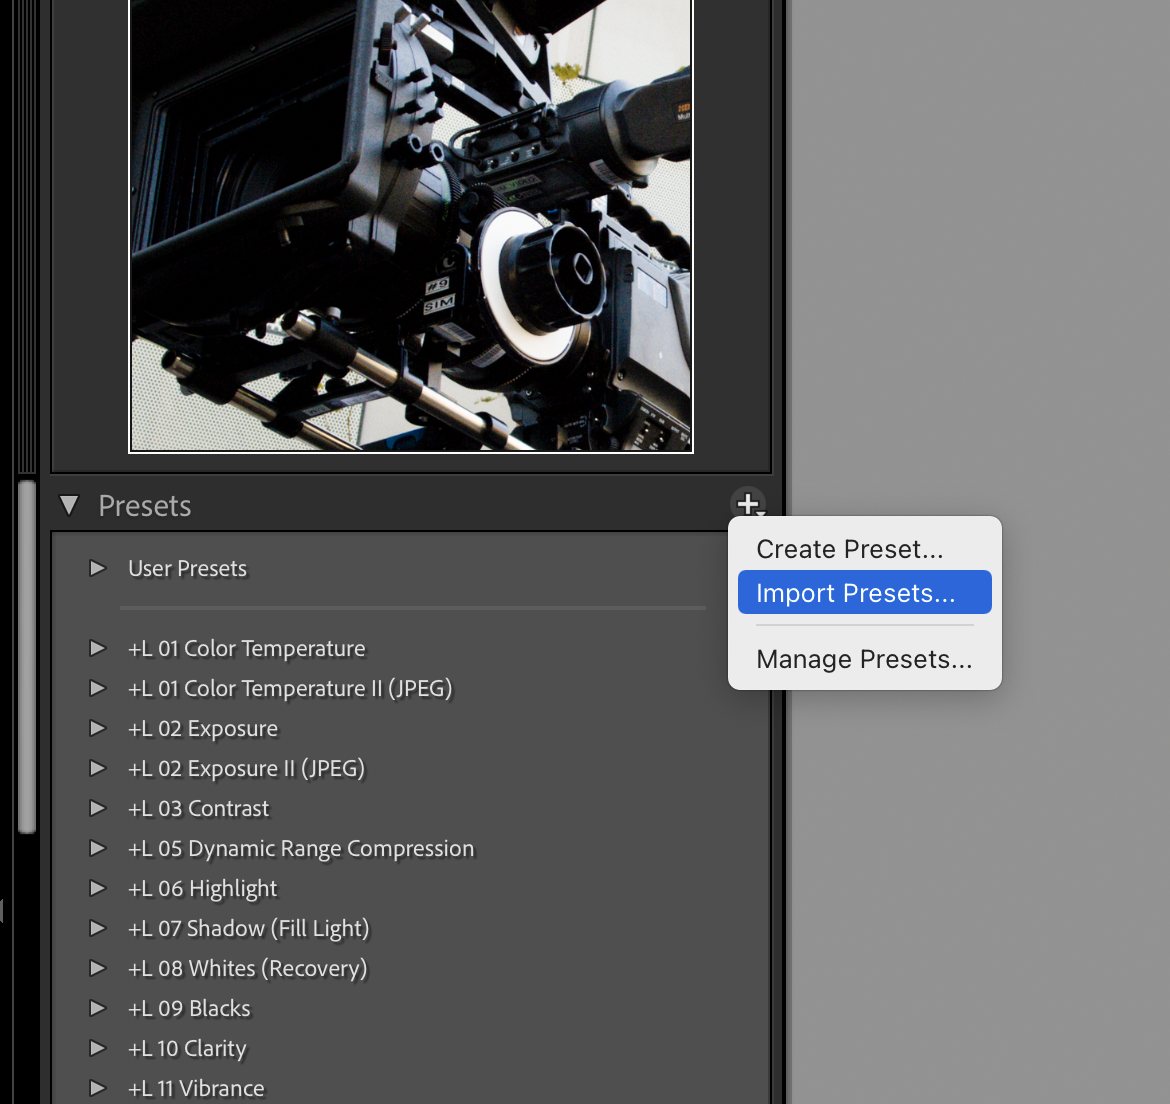
  • At the top of the list there’s a ... button. Click on that and choose Import Presets....
  • Navigate to the Prolost Presets folder that you decompressed.
  • Find the file named something like ____ Import Me.zip. Select that zip file and press Import.
  • The presets should appear after a moment.

Presets installed in Lightroom will sync to your Creative Cloud account and be available in all versions of Lightroom, including mobile, when logged in to that account.

More FAQs

Installing Prolost Profiles for Lightroom

 
importProfiles_01_crop.jpg
 

Before following these instructions, make sure you’re using the most up-to-date version of Lightroom. Using Lightroom Classic? Go here.

  • Decompress the zip file you downloaded from the Prolost Store in a convenient place, such as your Downloads folder.
  • In Lightroom, press E to reveal the Edit controls.
  • Twirl open the Profile section of the edit controls. It’s at the very top.
  • Click on Browse.
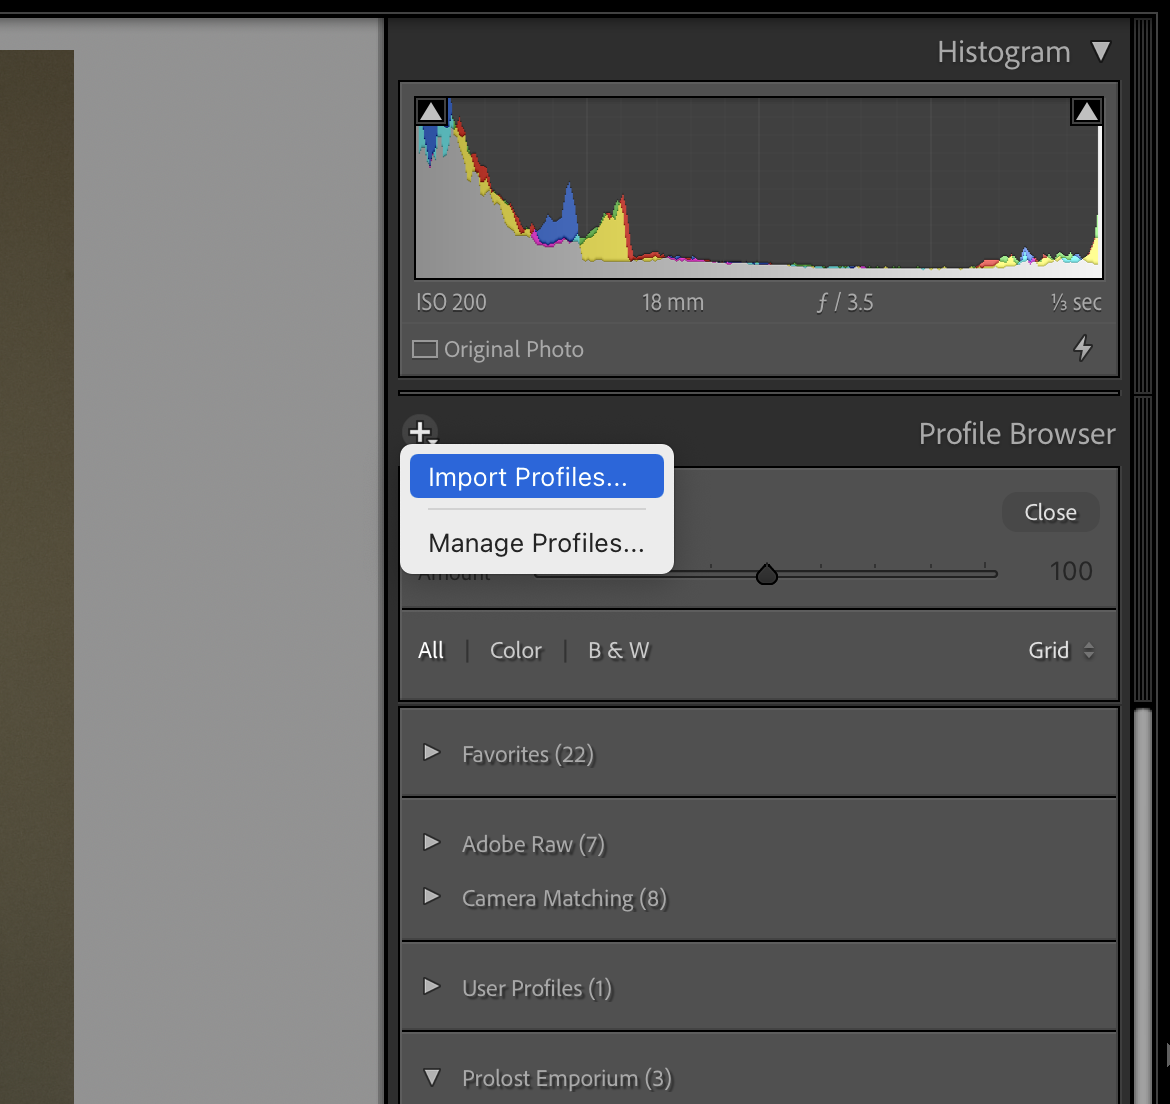
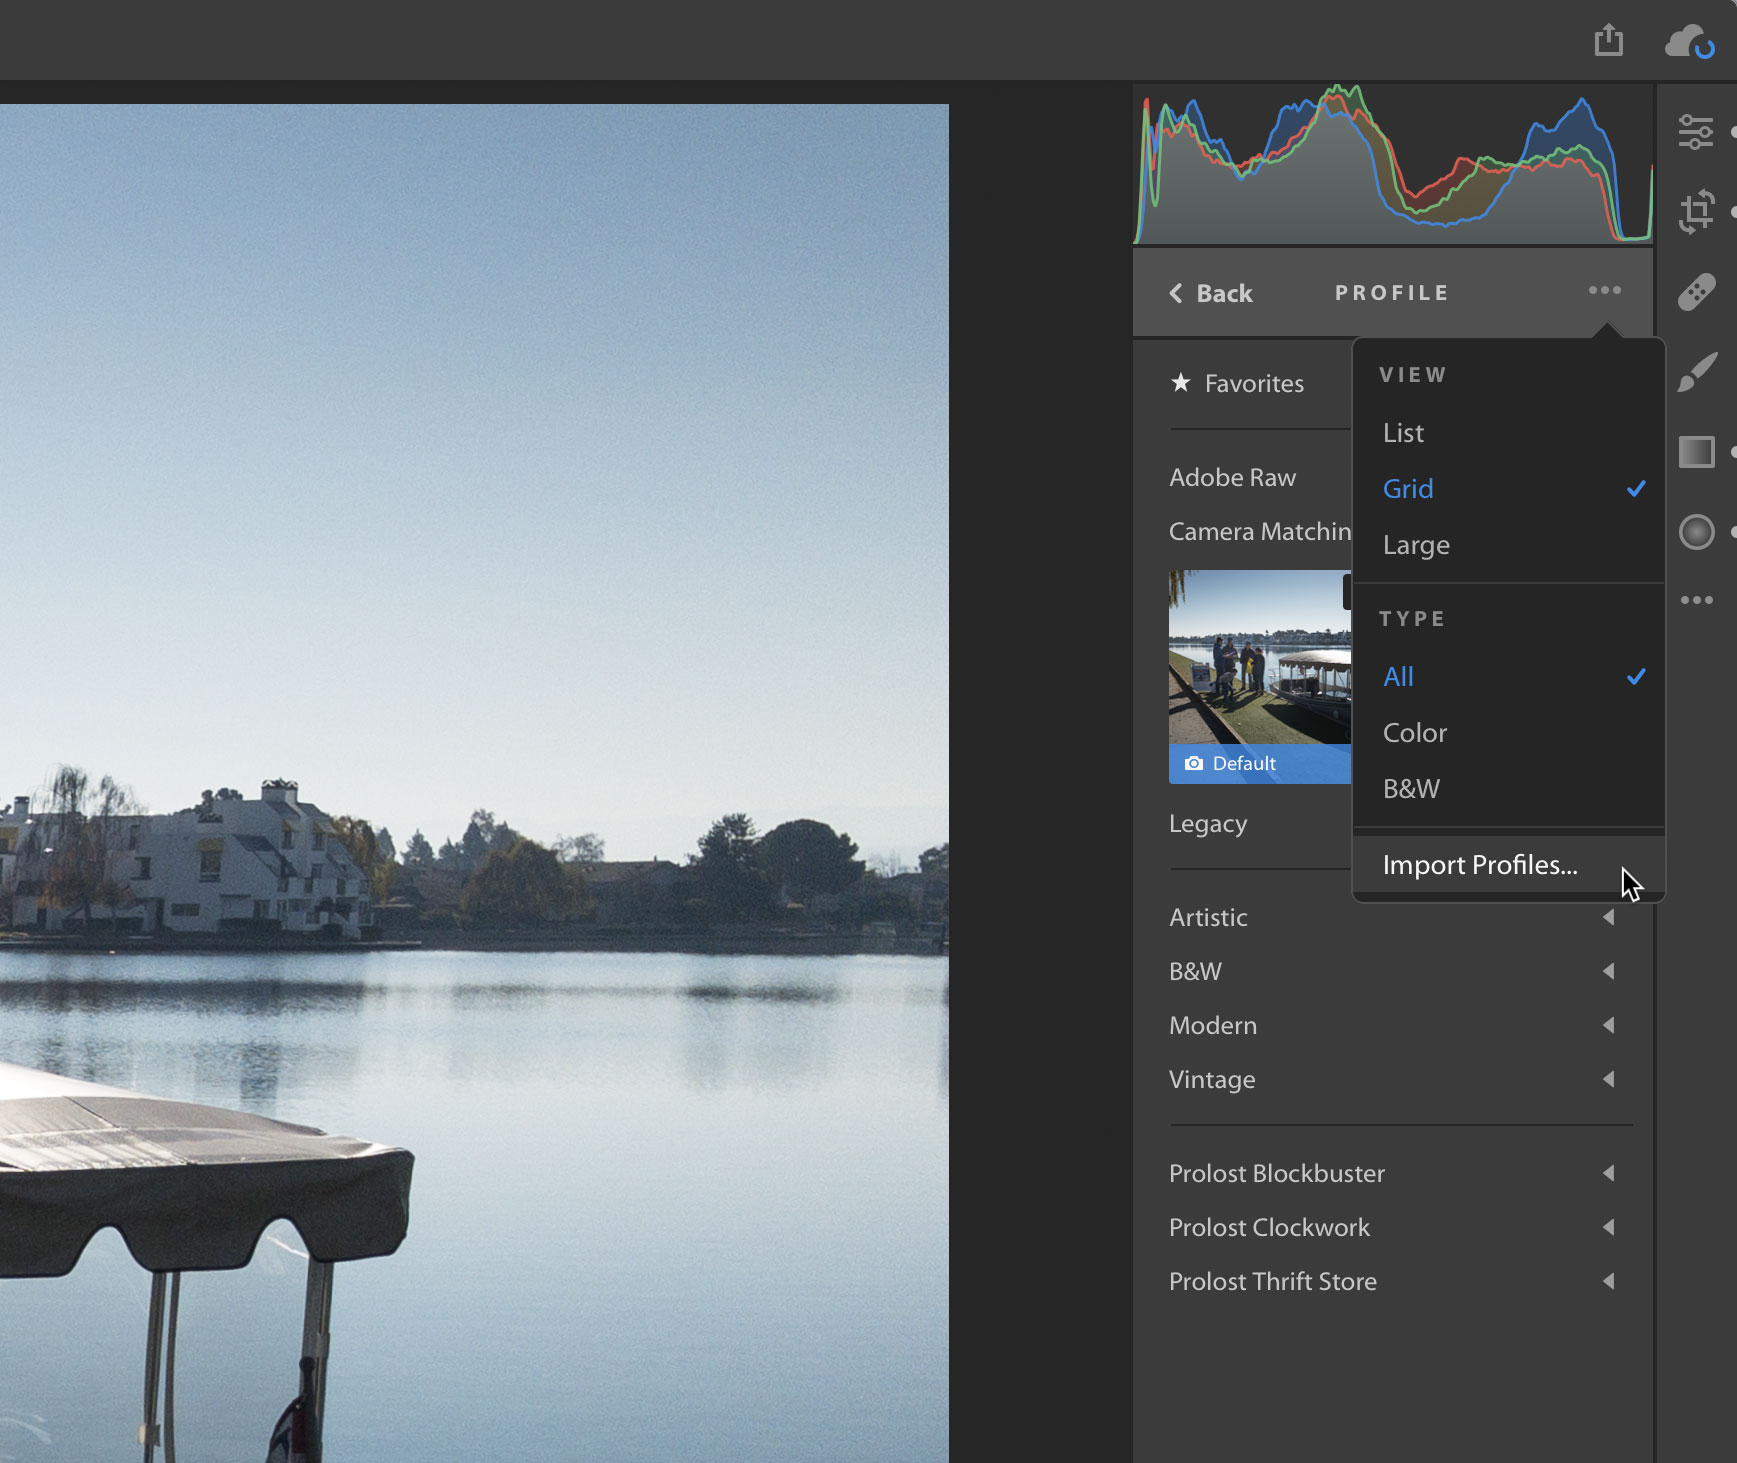
  • At the top of the Profile browser there’s a ... button. Click on that and choose Import Profiles....
  • Navigate to the Prolost Profiles folder that you decompressed.
  • Find the file named something like ____ Import Me.zip. Select that zip file and press Import.
  • The profiles should appear after a moment.

Profiles installed in Lightroom will sync to your Creative Cloud account and be available in all versions of Lightroom, including mobile, when logged in to that account.

More FAQs

How are Presets and Profiles shared/synced among Lightroom Classic, Lightroom CC, and Photoshop?

Lightroom CC 1.3 and Lightroom Classic 7.3 were released in April 2018, and changed how presets and profiles are saved and stored. Lightroom CC 1.4 was released in June 2018, and enabled syncing of Presets and Profiles with Lightroom CC for iOS and Android.

Lightroom Classic Shares Presets and Profiles with Photoshop

Lightroom Develop/Edit presets are now saved in the .xmp format that's compatible with Camera Raw in Photoshop, and Lightroom Classic and Photoshop share a common location for these presets, meaning that your preset collection will be the same in both apps.

On Mac, this folder is:

~/Library/Application Support/Adobe/CameraRaw/Settings

On Windows:

C:\ProgramData\Adobe\CameraRaw\Settings

Your Prolost Presets will be available in Photoshop, and any presets you create will be available in both Photoshop and Lightroom Classic.

Lightroom (formerly Lightroom CC) Syncs Presets and Profiles to your Creative Cloud Library

Presets and profiles in Lightroom CC 1.4 and later are synced with your Creative Cloud account, and should not be administered from outside the Lightroom CC app.

The Prolost Presets and Profiles you install in Lightroom will be available in Lightroom for iOS/iPadOS and Android.

More FAQs

Prolost Graduated Blockbuster and Color Contrast Presets Break When Upgrading to Lightroom Classic 7.3

This issue affects people who have the Prolost Graduated Presets installed in Lightroom 7.2 or earlier, and then update to Lightroom 7.3.

The first time you launch Lightroom Classic 7.3 after updating, all of your presets are converted from .lrpreset format to .xmp (more info here).

Unfortunately, there is a bug in this process that breaks the Tone Curve adjustments in the following Prolost Graduated presets:

  • Blockbuster Blue
  • Blockbuster Cyan
  • Blockbuster Gold
  • Blockbuster Sundrench
  • Color Contrast

The solution is to manually uninstall the converted presets, and re-install the updated versions from the Prolost Store.

Replacing the Corrupted Presets

This installation process involves copying folders of presets into a specific folder on your system drive. We'll start by locating the folder we're copying to.

On Mac, this folder is:

~/Library/Application Support/Adobe/CameraRaw/Settings

On Windows:

C:\ProgramData\Adobe\CameraRaw\Settings

  • Within this folder, locate the following folders full of preset files:

    • +L 14 Blockbuster Blue
    • +L 14 Blockbuster Cyan
    • +L 14 Blockbuster Gold
    • +L 14 Blockbuster Sundrench
    • +L 14 Color Contrast
  • Move these folders to a safe location, such as your Desktop.

  • Download the latest version of the Prolost Graduated Presets (request an updated download link here)
  • Decompress the zip file you downloaded.
  • In the folder that appears, locate the For Lightroom Classic 7.3+ folder.
  • Within that folder you will see the preset folders that begin with +L.
  • Select the following folders and copy them to the Settings folder you located above:
    • +L 14 Blockbuster Blue
    • +L 14 Blockbuster Cyan
    • +L 14 Blockbuster Gold
    • +L 14 Blockbuster Sundrench
    • +L 14 Color Contrast

Launch Lightroom. The replaced presets should appear in the Develop module. To confirm that they work, verify that Blockbuster Cyan Max gives your image a blue/cyan tint.

When you’ve confirmed that the new presets work, you can delete the five preset folders from your Desktop.
More FAQs

What’s the Difference Between Lightroom Presets and Profiles?

Presets

Lightroom Develop Presets are one-click shortcuts to applying Develop/Edit settings. A preset might be as simple as setting exposure, or as complicated as adding a complete look to a photo, or even local adjustments, which can create cool effects like the Prolost Light Leaks.

After you apply a Preset, you can see and adjust the changes in the Develop/Edit controls.

The Prolost Graduated Presets are special presets arranged in graduated groupings, allowing you a nice visual way to perform common image editing tasks.

Most Prolost presets support Lightroom 4 and up, although some require more recent versions.


Profiles

Lightroom Profiles typically apply an overall look to the photo. They leave all the Develop/Edit controls unchanged, so you are free to adjust them to taste. Unlike Presets, Profiles can create looks that are not possible with the Lightroom controls on their own. One way to think of Lightroom Profiles is as “virtual film stocks.”

Lightroom has long supported “Camera Profiles,” but they were not very visible, and used mostly to match camera JPEG output. With Lightroom Classic version 7.3, and Lightroom CC version 1.3, Profiles got a nice visual browsing system, and a differentiation between Camera Profiles and “Creative Profiles,” such as the Prolost Profiles, which make your photos look great regardless of originating camera.

Many Creative Profiles support an Amount slider, allowing you to choose how much of the Profile’s visual adjustment to apply to your photo.

Installing Prolost Presets for Lightroom Classic & Photoshop

Remember, Presets are different from Profiles. Looking to install some presets? Go here.

  • Update Lightroom Classic or Photoshop to the latest version.
  • In the Develop module of Lightroom Classic, or in the Camera Raw importer in Photoshop, open the Preset Browser.
  • Under the Plus button, choose Import Presets...
  • Choose the .zip file you downloaded.

The Presets will appear in the broswer after a moment. Presets installed in Lightroom Classic will also be available in Photoshop Camera Raw, and vice-versa.

More FAQs

What changed about Presets with Lightroom Classic 7.3 and Lightroom CC 1.3?

Lightroom CC 1.3 and Lightroom Classic 7.3 were released on April 3, 2018, and introduced a change in file format for Lightroom Presets.

Prior to this release, Lightroom Develop Presets had the .lrtemplate file extension, and were stored in a Lightroom-specific location.

As of Lightroom CC 1.3 and Lightroom Classic 7.3, Lightroom Develop Presets have the .xmp extension, and are compatible with the Adobe Camera Raw importer in Adobe Photoshop.

Presets in Lightroom Classic 7.3 and later are stored in the same location as Adobe Camera Raw, so installing the Prolost Presets for Lightroom Classic now means that they’re installed for Photoshop as well.

If you have .lrtemplate presets installed and then update to Lightroom Classic, your presets will automatically be converted to .xmp and relocated to the new folder. The .lrtemplate presets are left in place for compatibility with older versions.

Presets in Lightroom CC 1.3 and later are stored within the Library (.lrlibrary) file, and should not be administered from outside the Lightroom CC app.

More FAQs